Kill Your Mouse: Automate Mouse Clicks
This is the final installment of the Kill Your Mouse series.
By now everyone should have a firm grasp of keyboard shorcuts that save clicking with the mouse. Also, hopefully you have taken the few minutes necessary to get a grasp of our new best friend, AutoHotkey, which can launch programs as easy as pressing a key on the keyboard. The final step in killing your mouse is to take AutoHotkey to the next level. Hold onto your chairs, since you will be amazed at what this little program can do.
The Concept
Before diving into the scripting itself (which is easy, I promise), I thought it would be good to look at the conceptual view of this article. More precisely, what is is that you will learn by reading this?
Is there a certain place on your computer screen that you find yourself clicking all the time? For me, this is in my Quick Launch toolbar, most notably the "My Documents" shortcut that I put there. This article will teach you how to map a hotkey to actually click anywhere on the screen with your mouse.
Figuring Out Where to Click
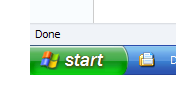
The first thing we will learn is how to use AutoHotkey to make the mouse click somewhere on the screen, at the push of a key. First off, you'll need to make sure you have installed AutoHotkey, as described in the last Kill Your Mouse article. For the purposes of this tutorial, we will assume you want to click something in your Quick Launch bar. For me, this is my "My Documents" shortcut:
The easiest way to make our script work is to use a handy program that comes with AutoHotkey, called "AutoIt3 Window Spy". Launch this program from your Start menu, or by right clicking on your AutoHotkey "H" in the system tray and selecting "Window Spy". Once launched, it will be blank, until you click out of it and move your mouse around. You will immediately notice the "Active Window Info" window to fill with data that changes as your mouse moves around the screen. For our purposes, the crucial part is in the second section called "Mouse Position".
What you do is simply position your mouse on the screen where you want to automate the click, then look in the "Active Window Info" window to see where that pixel position is. If you want to click relative to an active window, write down the "In Active Window" coordinates. If you want to click based on the entire screen (as I do for my Quick Launch toolbar), write down the "On Screen" coordinates. For my example, this is (116, 784).
Writing the Script
Now that we know where to tell the script to click, we simply have to code it. This is easy as pie, trust me. 🙂
Open up your AutoHotkey.ini file (right click on the system tray H, and select Edit). Now you can just go below where you previously added your program hotkeys, and add another few lines to your script.
First, we need a line to tell the script what key to assign to this mouse click. I selected the combination of Windows + z, since they're close together and not used for anything else.
#z::
Second, we must tell the script that we want to use absolute coordinates, since we're clicking on the toolbar (it never moves, and it's not in a window).
CoordMode, Mouse, Screen
Third, we tell the script where to click:
MouseClick, Left, 116, 784
Fourth, we basically reverse the second command, by telling the script to go back to relative positioning. This is useful in case you add later mouse clicks in your script. It's not necessary, but it's good practice to do it.
CoordMode, Mouse, Relative
Finally (and crucially), we tell the script that we're done.
return
Putting it to Work
Once you have done all this, you should have several lines that look something like the follow. Please note that your coordinates will be different.
#z::
CoordMode, Mouse, Screen
MouseClick, Left, 116, 784
CoordMode, Mouse, Relative
return
Once you have this in your AutoHotkey.ini file, you simply need to save your changes. Then right click on the system tray H, and reload the file. Now you should be able to press the key combination defined in line one, and watch your mouse click away.
Personal Challenge
Ok, if you have made it this far, congratulations! I commend you on putting up with my ramblings, and actually weeding through the code I have thrown at you. Hopefully you have found this series helpful. If you really want to take things to another level, you can study a bit more about AutoHotkeys and automate just about anything on your computer. I will probably write more about this in the future, but see what you can do on your own. Also, let me know if you have other uses for this awesome program.
The Series: Kill Your Mouse
- Your Legal Career Will Thank You
- Keyboard Shortcuts, and More Windows Keyboard Shortcuts
- Launch Applications with a Key Press
[tags]legal andrew, autohotkey, keyboard, shortcut[/tags]
Get more legal tips
|
See also... |
Comments
5 Responses to “Kill Your Mouse: Automate Mouse Clicks”
-
Legal tips by email
Sign-up below to get email tips and exclusive discounts on videos, webinars, and future items.
All fields are required.
-
Receive updates
By email
By rss (full feed)
-
About Andrew Flusche
Lawyer, bicyclist, husband.
More about me...
Tumble Log


-
Popular Posts
May 28th, 2006
I stumbled across your blog doing a search for a sample autohotkey.ini
This ‘kill your mouse’ is a good topic.
I am a medical transcriber and I too hate the mouse.
I did want to tell you about a very nice free tool that is specifically for the WindowsKey. It too is easily programmed and with combinations can provide hundreds of functions. The company that created it no longer supports it – but it’s so simple, it really needs no support. You can d/l it here — I’m quite sure you’ll find it very useful too:
http://www.softpedia.com/get/S.....nKey.shtml
May 29th, 2006
bren,
I am glad that you enjoyed this series. I hope it gave you some good ideas for your autohotkey.ini file.
I have actually tried out the program you linked to here. It is a pretty good utility, but it conflicted with another program I use and love: Colibri. It allows you to launch any program by typing a hotkey, and then typing part of the program’s name. I will definitely write about it in the future.
February 12th, 2008
Thanks for the article. Just wanted you to know somebody is looking at it still. I never realized how many mouse clicks it take to set up printing the way I want it in intellicad (19 clicks!). This was easy to do and works great!
February 17th, 2008
Don – I’m glad the article helped you out. Now you get to save 19 clicks every time you print!
October 13th, 2009
I tried to make a script that makes multiple mouse clicks. I wrote:
#z::
CoordMode, Mouse, Screen
MouseClick, Left, 333,489
CoordMode, Mouse, Relative
CoordMode, Mouse, Screen
MouseClick, Left, 94,654
CoordMode, Mouse, Relative
return
It dosn’t seem to work. The second click is the only one that registers. What should I do?
And also, Is there a way to pause the script for a few miliseconds between each click?
Thanks a ton!
Evan